Contents
Rebound Hammer Test: –
Testing the strength of concrete without destructing or breaking it after hardening is a complex task.
As we already discussed the Compressive strength of concrete by Concrete Cube test which is a destructive test worked out in the lab. You can refer here.
Compressive Strength of Concrete Test (Cube Test of Concrete)
Rebound hammer test is a Non-destructive (NDT test of Concrete) and simple concrete test which is used to test the Compressive strength of concrete without any damage. Moreover, the best part of Rebound hammer test is concrete can be tested in real time at the site instead of going to the lab without any damage.
Concrete Rebound hammer test was first covered by IS 13311 (Part 2) – 1992. Swiss engineer Ernst Schmidt is the name of the scientist who first introduced Rebound hammer test, and it is also called as Schmidt hammer test or Swiss Hammer Test.
Now let’s dive into rebound hammer test:
Before knowing the procedure learn how Schidmt hammer works and measures Compressive strength of concrete.
About Schmidt hammer test:
Schidmt hammer consists of Spring loaded hammer Elastic mass (test equipment) ended with a plunger which can be easily operated with your hand. This hammer is impacted on the surface of the sample. The Schidmt hammer hit the concrete at defined energy, and rebound number is measured with the help of writer and the rebound number correlated with the Compressive strength of concrete.

Figure 1
For understanding, Take a rubber band and stretch it oppositely, Rubberband has an elastic property which it regains or rebound to its original position Similarly, Schmidt hammer is impacted on a concrete surface and then it rebounds to its original position. For more details about Hammer refer the following figure of Schmidt Rebound Hammer.

Figure 2
The impact of rebound is evaluated using a graph of the hardness of the concrete & rebound number, and then the compressive strength is calculated.
Operation of the Schmidt Rebound hammer:
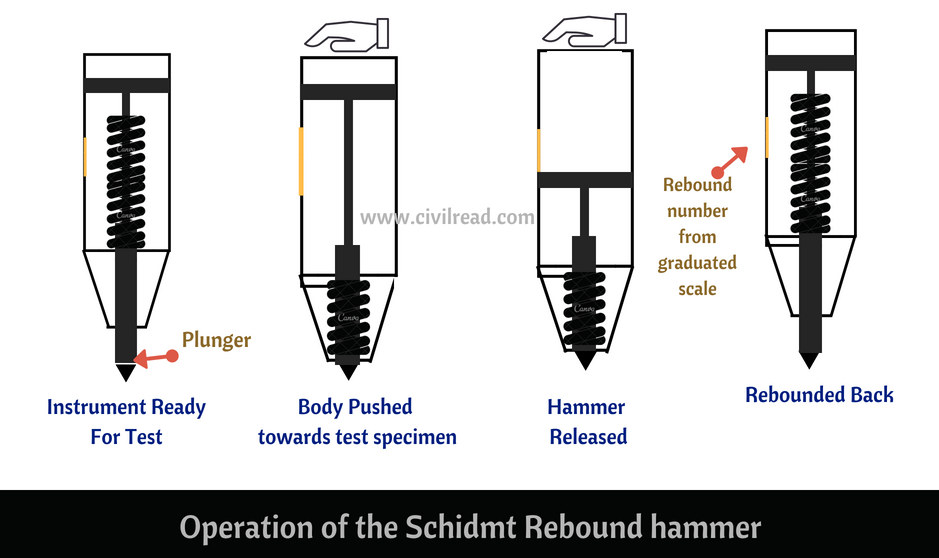
The operation of Schmidt hammer is depicted in the following diagram and you can also refer the above figure 1 for clear understanding.

Figure 3
From Figure 3, the first image of the Rebound hammer is set the right angle to the concrete surface and in the second hammer is pushed to the concrete surface at defined energy. And in the third, the hammer is released, so in the fourth image, the hammer rebounds and shows rebound number in the graduated scale.
Procedure for Schmidt hammer test or Rebound Hammer Test:
Before starting the procedure calibration of the hammer is required. To do this, the Schmidt hammer is tested against the Steel test anvil which has a Brinell hardness number of about 5000MPa.
- Clean the surface of concrete, ensure the concrete is clean and dirt free.
- As mentioned in the Operation of Rebound hammer, it involves four stages in the first stage the hammer is held at right angles to the Concrete Surface of structure for finding the rebound number.
- Ensure that the hammer is placed exactly right angle to the concrete surface other angles may show a discrepancy in results.
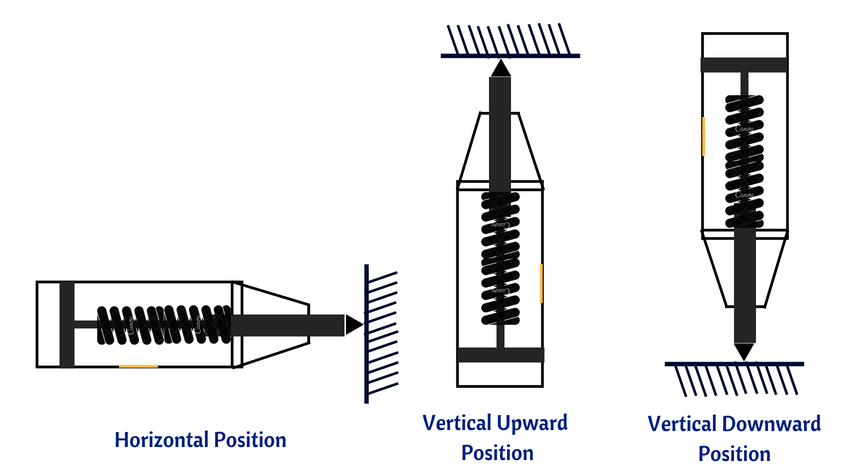
Below diagram depicts the different positions to test the concrete specimen.

Figure 4
- The procedure is same for different positions but ensure that you are holding the hammer in right angles to the test specimen. Suppose to test the strength of column the Horizontal Position is implemented. Similarly for testing beam strength Vertical Upward Position is implemented.
- After Holding Hammer in position then the plunger is made to hit the concrete surface with impact energy.
- Approximate Impact energy levels are mentioned in the below table. The impact energy is different for different applications of concrete.
| Applications | Impact Energy for Rebound Hammer in Nm |
|---|---|
| light weight concrete | 0.75 |
| Normal Weight Concrete | 2.25 |
| For mass concrete testing Eg: In roads, hydraulic structures and pavements | 30 |
- After pushing plunger towards the concrete surface, it rebounds back and shows a reading in a graduated scale which is noted as a rebound number.
- 5-6 readings of rebound number are measured and average the results for rebound index.
- After finding the rebound index, the value is correlated with the Compressive strength by using the below graph.
Rebound Hammer Test Graph:
As you can see there are different lines are interpolated in the graph. The graph is different for different positions which is clearly depicted.

Figure 5
Suppose, if the average rebound number for horizontal position (concrete column) is 38(rebound index) as per graph the Compressive strength is 36N/mm2
The below table gives Quality of concrete for different values of rebound number.
| Average Rebound number | Quality of concrete |
|---|---|
| >40 | Very good hard layer |
| 30 to 40 | Good Layer |
| 20 to 30 | Fair |
| <20 | Poor concrete |
| 0 | Delaminated |
Advantages of Rebound hammer:
- It is a simple and instant test which can be performed on site.
- This test does not require any calculation to find the Compressive strength, find a rebound number and correlate it in graph.
- It is a Non-destructive test which is very helpful in finding the strength of old monuments.
- The price of the rebound hammer is low when compared with the Universal testing machine to find the Compressive strength of concrete.
- This method is not only used to find out the Compressive strength of concrete it also helps in comparing one particular element to other and to find the concrete uniformity and quality as well.
Disadvantages of Rebound hammer:
- The Hammer should be precisely pushed in right angle to the surface other intermediate angles show wrong results.
- Flaws cannot be detected easily, and periodic maintenance is must required.
- Rebound hammer test is influenced by various factors: type of cement & aggregate, atmospheric moisture and presence of moisture content in concrete constituents and curing methods.
Video Explanation of Rebound Hammer or Schmidt Hammer Test:
Also Read:
Cube Test of Concrete
Important Properties of Concrete
For Instant updates & to discuss Join our Telegram Group ClickHere
Never Miss an update Click on “AllowUS” and make us allow or Click on Red notification bell at bottom right and allow notifications.
Stay tuned!
Civil Read Wishes you ALL the BEST for your future.


Good topic.send regular . thanks
Approximately—-How long after placing foundation concrete in an average single family home in Texas.
Properly perform Schmidt hammer test…
1week. 2 weeks. 3. 4. 5. 6 weeks
4 weeks
How does the result affect if the floor has a floor hardener?What could be the correction to the results?